Set up Zigbee dongle with HA
Connect and setup Sonoff Zigbee 3.0 dongle with HA
Environment#
- OS: Debian GNU/Linux 12 (bookworm)
- Kernel: Linux 6.12.33+deb12-amd64
- Architecture: x86-64
- HA: Home Assistant Container
- Core: 2025.7.4
- Frontend: 20250702.3
Goal#
This guide will walk through the steps setup Sonoff ZBDongle-E connected with Home Assistant, as preparation for connecting variety of Zigbee devices.
Here we will be using Zigbee2MQTT (Z2M) ↗ as Zigbee bridges due to it’s better compatibilities to various devices. For simpler setup, you could also consider Zigbee Home Automation (ZHA) ↗ . See Background for more details.
Introduction#
We want to connect Zigbee devices and sensors from various manufacturers and manage them all through Home Assistant. However, many of these devices require binding to the vendor’s own platform (e.g., Tapo, Aqara), with data uploaded to their respective clouds. To unify everything locally for both convenience and privacy, we can communicate with Zigbee-compatible devices directly via the Zigbee protocol.
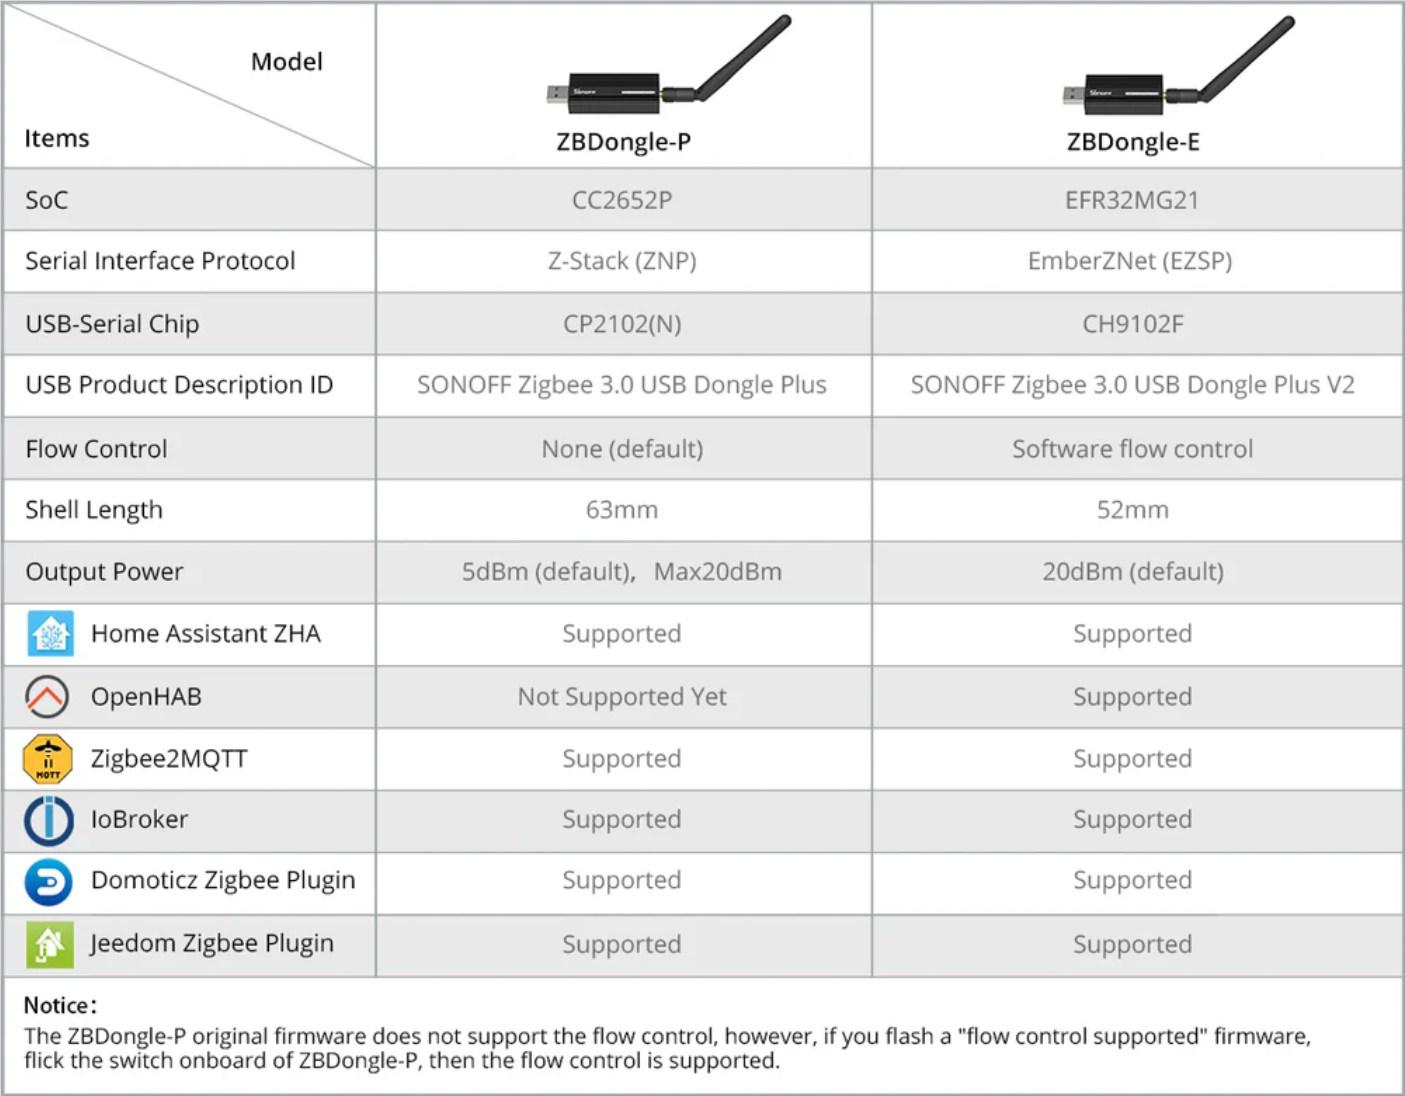
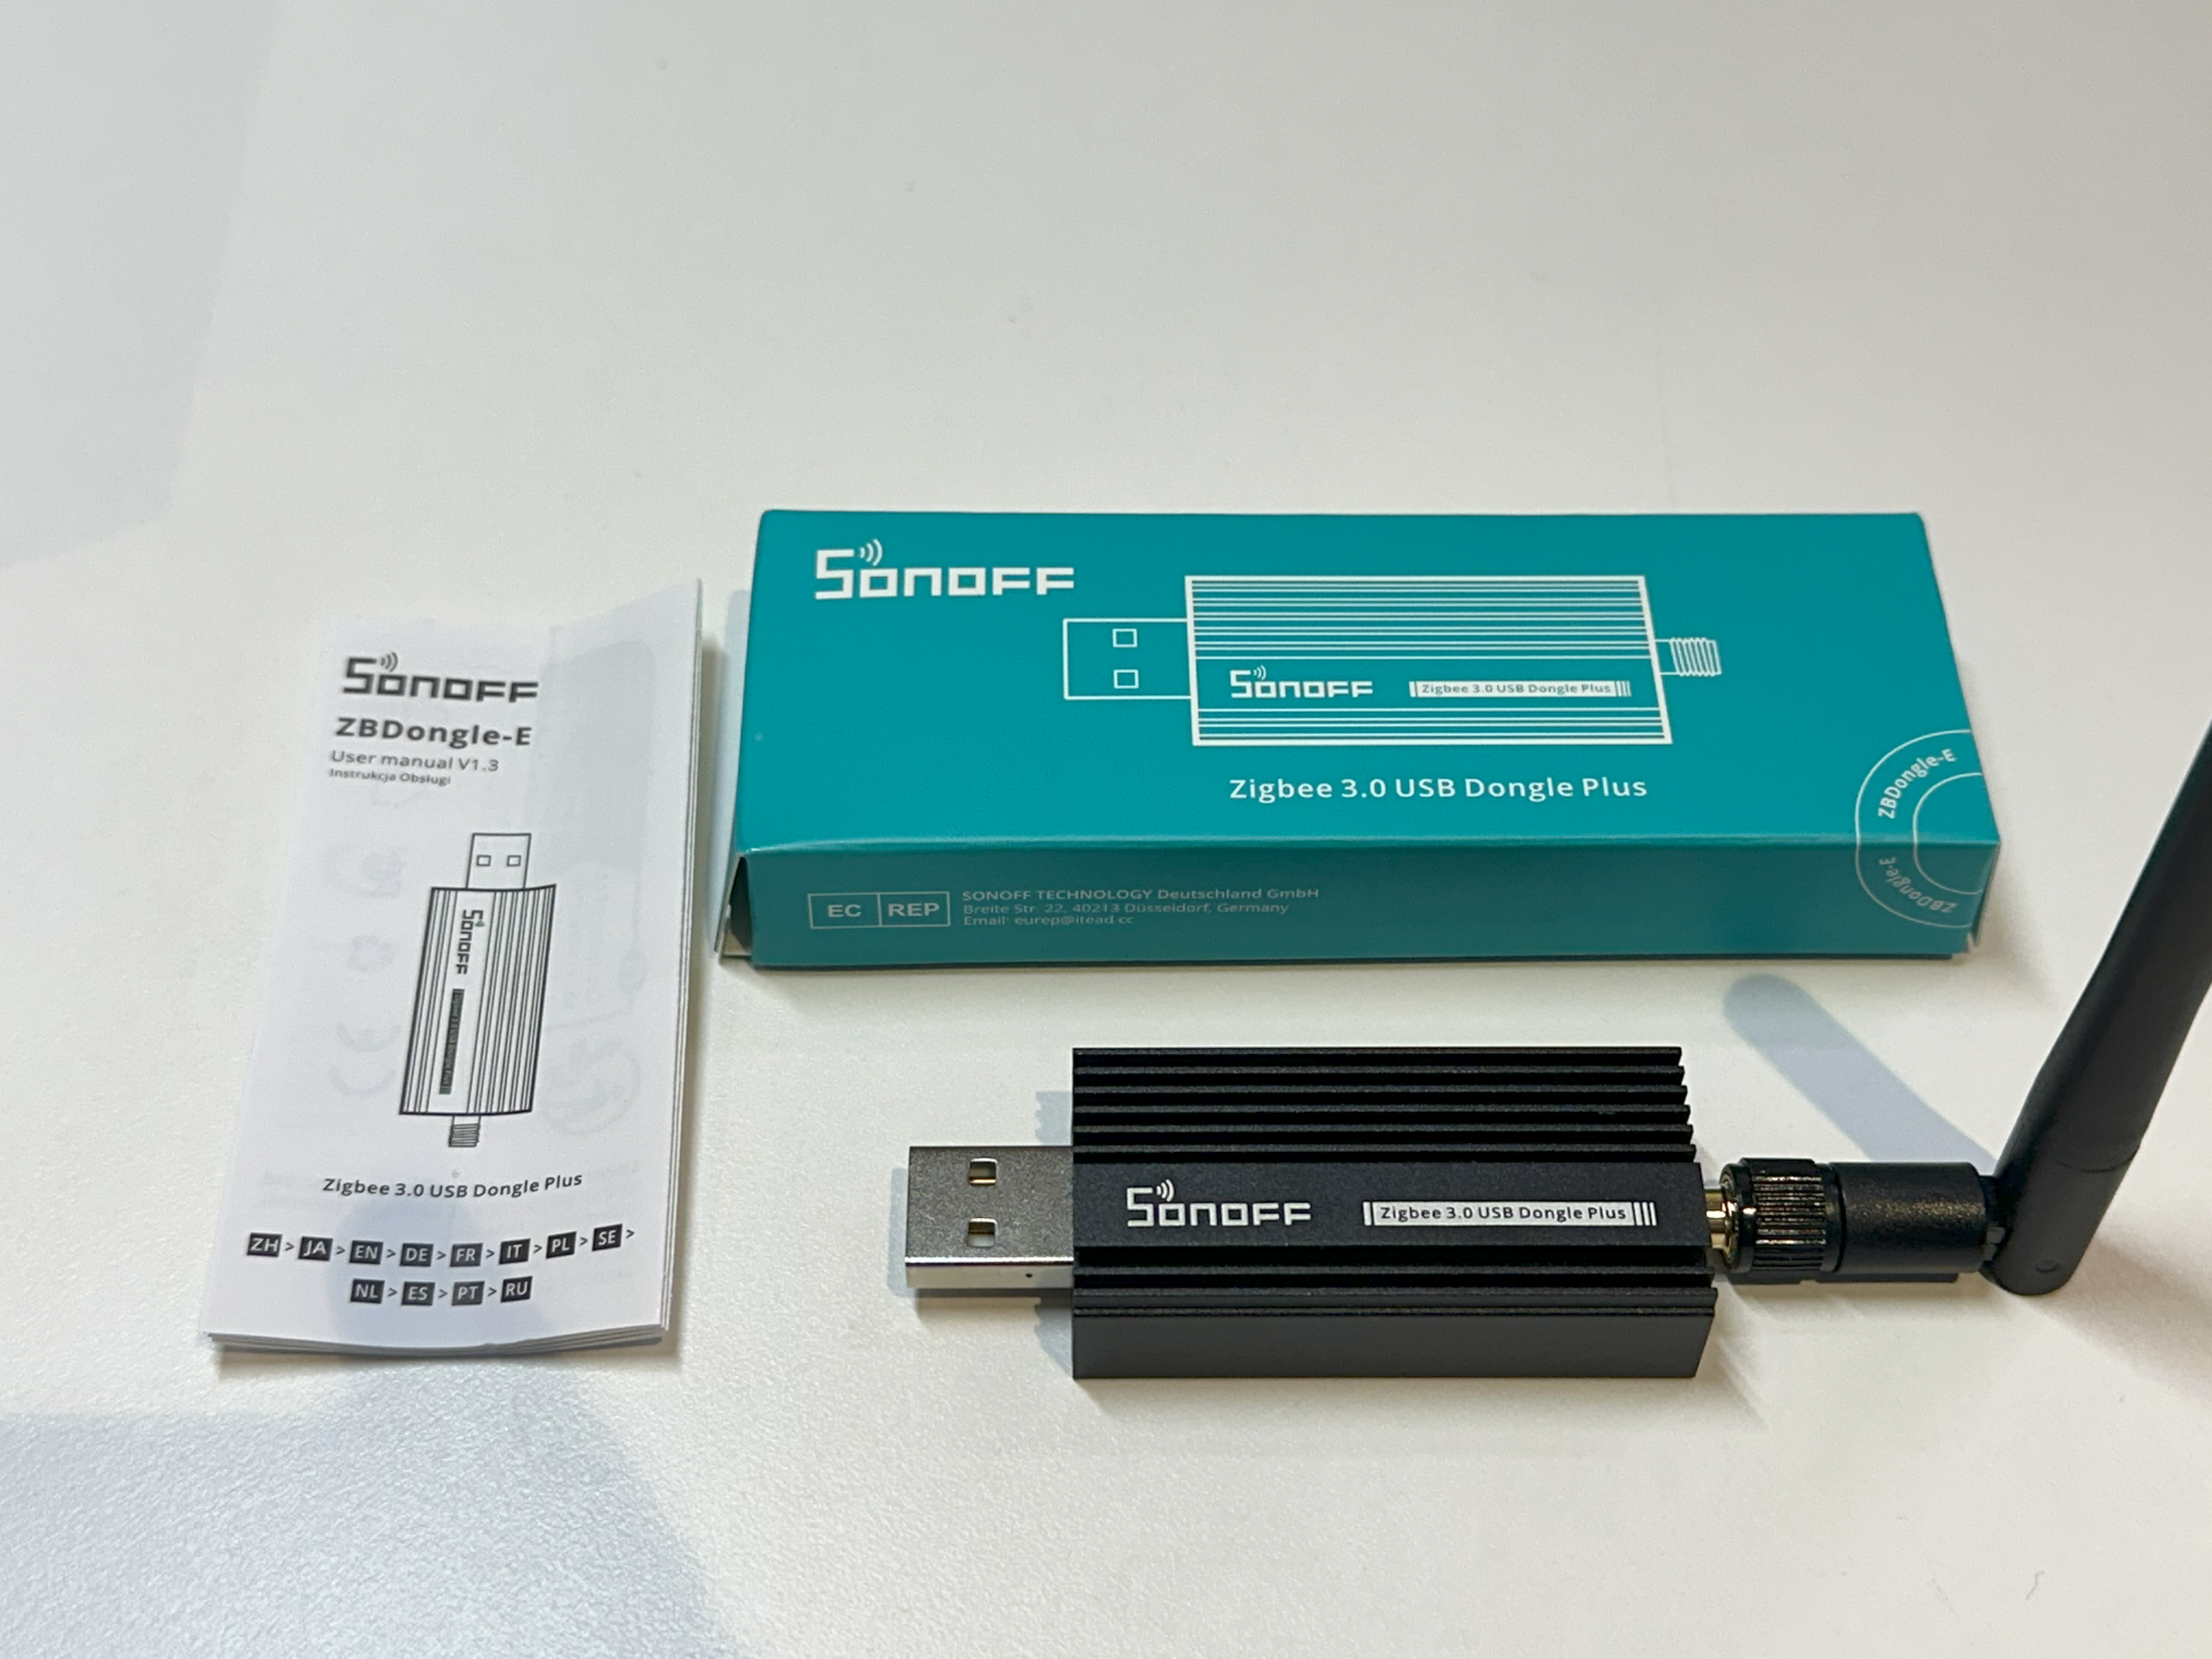
For this, we need a Zigbee 3.0 USB dongle. After some research, I found the Sonoff Zigbee 3.0 USB Dongle-P ↗ to be one of the most popular options. I ended up purchasing its upgraded version, the Sonoff Zigbee 3.0 USB Dongle-E ↗, also known as Dongle Plus V2. Although some reviews noted that the Dongle-E was less stable and compatible than the Dongle-P, continuous firmware updates over the past couple of years have brought it to a much more stable state.
Background#
Set up with Z2M#
flowchart LR
  %% --- Zigbee side ---
  subgraph Zigbee_Network["Zigbee Network"]
    ZDev1["Zigbee sensor 1"]
    ZDev2["Zigbee sensor 2"]
  end

  Coord["Sonoff ZBDongle-E"]

  ZDev1 -- "Zigbee frames" --> Coord
  ZDev2 -- "Zigbee frames" --> Coord

  %% --- Host side (Docker) ---
  subgraph Host["Debian mini PC (Docker)"]
    Z2M["Zigbee2MQTT<br/>(adapter: ember, serial: /dev/ttyUSB-ZBDongleE,<br/>baud: 115200, software flow control)"]
    Broker["Mosquitto<br/>MQTT Broker"]
    HA["Home Assistant<br/>(MQTT integration)"]
  end

  Coord <-->|"EZSP over serial (USB)"| Z2M
  Z2M -->|PUBLISH device states on topics| Broker
  HA -->|SUBSCRIBE discovery/states| Broker
  HA -->|PUBLISH commands| Broker
  Broker -->|FORWARD messages| Z2M
  Z2M -->|convert to Zigbee commands| Coord
  Coord --> ZDev1
Coord --> ZDev2Set up with ZHA#
flowchart LR
  %% --- Zigbee side ---
  subgraph Zigbee_Network[Zigbee Network]
    ZDev1["Zigbee sensor 1"]
    ZDev2["Zigbee sensor 2"]
  end

  Coord["Sonoff ZBDongle-E"]

  ZDev1 --> |Zigbee frames| Coord
  ZDev2 --> |Zigbee frames| Coord

  %% --- Host side (Docker) ---
  subgraph HAHost["Debian mini PC (Docker)"]
    subgraph HA["Home Assistant container"]
      ZHA["ZHA integration<br/>(native Zigbee gateway)"]
      Zigpy["zigpy core<br/>(Zigbee stack in Python)"]
      Bellows["Radio library: bellows<br/>(EZSP for EFR32)"]
      HACore["HA Core<br/>entities, automations, UI"]
    end
  end

  ZHA -->|uses| Zigpy
  Zigpy -->|loads radio| Bellows
  Bellows <-->|"EZSP over serial (USB)"| Coord
  ZHA -->|creates entities/events| HACore
  HACore -->|service calls| ZHA
Step-by-step Guide#
1. Flash official firmware on the ZBDongle-E#
According to the official guide ↗, they have released an online quick flasher for ZBDongle. This makes thing much easier.
Official Tutorial: SONOFF Dongle Quick Flasher: Effortless Firmware Updates in 1 Minute ↗
First we need to connect our dongle via USB, and go to the online flasher, click “Connect”.
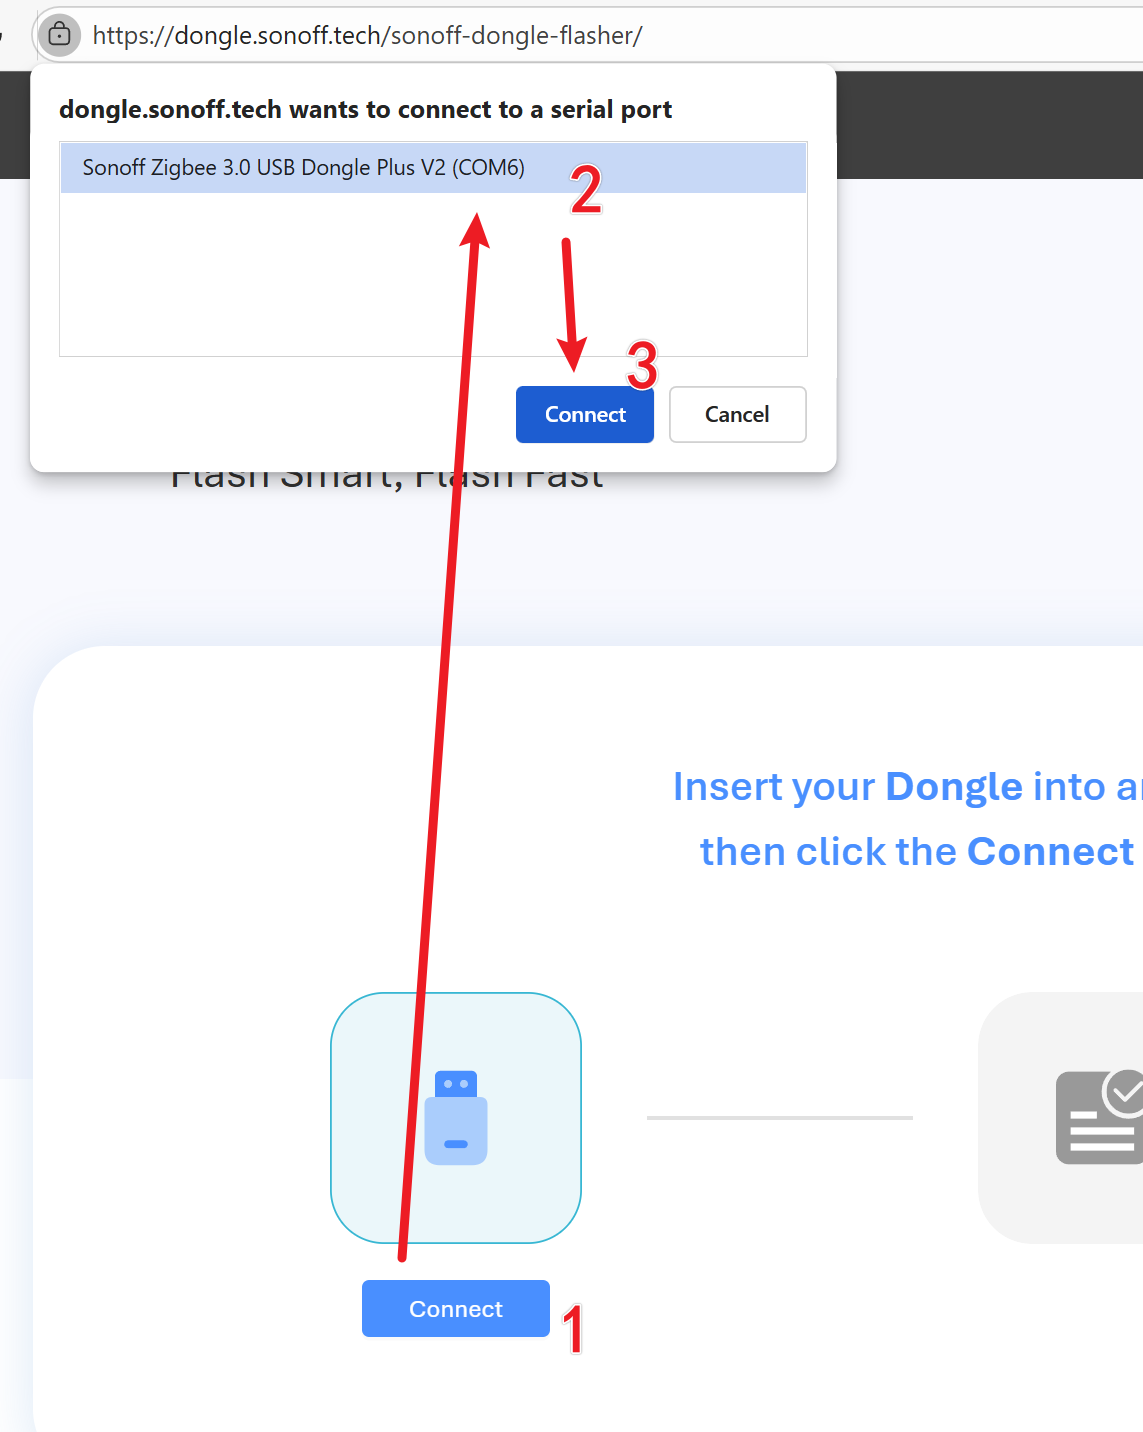
Wait a few seconds, the tool should successfully detect the dongle. Then we can flash the latest firmware by clicking “Flash”.

After it completes, it will display “Firmware flashing complete, the device will restart automatically”, and it’s safe to unplug the dongle now.
We can still manually installing firmware into the dongle. Just be careful that we are installing Coordinator as firmware type; NOT Router or Thread. Follow the official guide for Dongle-E here ↗.
Next, plug the dongle to your HA host, and confirm the dongle is visible from the serial port by executing this command on the host.
$ ls -l /dev/serial/by-id/
total 0
lrwxrwxrwx 1 root root 13 Aug 31 15:25 usb-Itead_Sonoff_Zigbee_3.0_USB_Dongle_Plus_V2_2e3ace430dc3ef119d08e2b08048b910-if00-port0 -> ../../ttyUSB02. Preparation#
2.1 Uninstall ModemManager#
Firstly, if your HA is running on Linux, it is recommended to uninstall or disable ModemManager, as it would “sniff” any new serial port, causing “Serial port is locked/Resource busy/ping timeout” errors. Check out HA doc here ↗
If you don’t plan to use WWAN connection, uninstalling or disabling it would be the safest way (See discussion here ↗).
$ sudo apt-get purge modemmanager     # Uninstall
$ sudo systemctl disable ModemManager # DisableTo confirm it’s being uninstalled:
$ systemctl status ModemManager
Unit ModemManager.service could not be found.(If you want to remain ModemManager for future use, you can just disable it for now, but it may restart and causes potential issues in future. In this case, you may need to somehow explicitly let ModemManager to ignore the ZBDongle device)
2.2 Plug adapter to the host correctly#
There are two recommended setup for the USB adapter:
- Use a USB extension cable to keep the adapter at least 50cm away from the computer can largely reduce the interference from computer’s radio signals.
- Plug the adapter to a USB 2 instead of USB 3 port.
As stated in the official doc:
When plugged directly into the computer, the antenna suffers from interference of radio signals and electrical components of the computer. … Additionally, it may help to plug the adapter to a USB 2 instead of USB 3 port.
Check out official doc ↗ for more details.
3. Install, Config & Start Z2M bridge and MQTT Broker (Mosquitto)#
3.1 Create required directories and files#
The following directories are required by the services, so we should create them before hand.
- Mosquitto ↗
config/,data/,log/
- Zigbee2MQTT ↗
data/
Run this to create required directories in /opt
mkdir -p /opt/{mosquitto/config,mosquitto/data,mosquitto/log,zigbee2mqtt/data}This creates
zigbee2mqtt/
└── data
mosquitto/
├── config
├── data
└── log3.2 Mosquitto#
Update docker compose file:
## ...rest

mosquitto:
  container_name: mqtt5
  image: eclipse-mosquitto:latest
  network_mode: host
  restart: unless-stopped
  volumes:
    - /opt/mosquitto/config:/mosquitto/config
    - /opt/mosquitto/data:/mosquitto/data
    - /opt/mosquitto/log:/mosquitto/log

## ...restCreate configuration file:
/opt/mosquitto/config/mosquitto.config
## Network listener port
listener 1883

## Disable anonymous connections, enable password authentication
allow_anonymous false
password_file /mosquitto/config/passwords

## Enable persistence, save subscription and message state
persistence true
persistence_location /mosquitto/data/

## Log level (optional)
log_type all
log_dest stdoutUse Docker to run Mosquitto’s mosquitto_passwd tool to create the MQTT user password file and add a user z2m with a password (remember to replace <STRONG_PASSWORD> with your password):
docker run --rm -it -v /opt/mosquitto/config:/mosquitto/config eclipse-mosquitto \
mosquitto_passwd -b -c /mosquitto/config/passwords z2m <STRONG_PASSWORD>Explanation:
- Docker part
--rm: Automatically remove the container after it finishes, avoiding leftover temporary containers.-it: Run the container in interactive mode;-ikeeps stdin open,-tallocates a pseudo-terminal.-v /opt/mosquitto/config:/mosquitto/config: Mount the host’s/opt/mosquitto/configdirectory into the container at/mosquitto/configfor reading and writing config files.eclipse-mosquitto: Use the Eclipse Mosquitto latest image.
- Mosquitto part
-b: Batch mode — provide the password directly on the command line (no interactive prompt).-c: Create a new password file — overwrites it if it already exists./mosquitto/config/passwords: Path to the password file (inside the container).z2m: The username.<STRONG_PASSWORD>: The password you want to set (replace with a strong password).
To add more users in the future without overwriting the existing file, drop the -c flag and use only -b to append users.
To test mosquitto, in the same folder with docker-compose.yaml, run the container that we just defined:
docker compose up -dOr, you can create containers first but not to start them:
docker compose up --no-startThen, start mosquitto only:
docker compose start mosquitto zigbee2mqttUse docker ps to verify mosquitto has been started and running.
Next, we can open two new terminals, one for publisher and one for subscriber, let the publisher send a test message to the subscriber.
## terminal 1 (subscribe)
docker run --rm -it --network host eclipse-mosquitto:2 \
  mosquitto_sub -h 127.0.0.1 -p 1883 -u z2m -P '<STRONG_PASSWORD>' -t 'test' -v

## terminal 2 (publish)
docker run --rm -it --network host eclipse-mosquitto:2 \
mosquitto_pub -h 127.0.0.1 -p 1883 -u z2m -P '<STRONG_PASSWORD>' -t 'test' -m 'hello'Explanation:
--network host: Use the host’s network so the container can reach Mosquitto on127.0.0.1:1883.mosquitto_sub: Subscribe to a topic and print incoming messages.-h 127.0.0.1 -p 1883: Connect to the local Mosquitto broker.-u z2m -P '<STRONG_PASSWORD>': Authenticate with the credentials we created earlier.-t 'test': Subscribe to the topic namedtest.-v: Verbose mode — print the topic name alongside the message payload.
mosquitto_pub: Publish a message to a topic.-m 'hello': The message payload to send.
The subscriber will print this out in terminal:
test hello3.3 Zigbee2mqtt#
Docker compose service official docs: Docker | Zigbee2MQTT ↗
docker-compose.yaml
## ...rest

zigbee2mqtt:
  container_name: z2m
  image: ghcr.io/koenkk/zigbee2mqtt:latest
  network_mode: host  # posts mapping will be ignored
  restart: unless-stopped
  devices:
    - /dev/serial/by-id/usb-Itead_Sonoff_Zigbee_3.0_USB_Dongle_Plus_V2_2e3ace430dc3ef119d08e2b08048b910-if00-port0:/dev/ttyUSB-ZBDongleE
  volumes:
    - /opt/zigbee2mqtt/data:/app/data   # as per official docs
    - /run/udev:/run/udev:ro  # required for auto-detecting the adapter
  environment:
      - TZ=Australia/Melbourne

## ...restConfiguration files: official docs: Configuration | Zigbee2MQTT ↗
/opt/zigbee2mqtt/data/configuration.yaml
version: 4
mqtt:
    base_topic: zigbee2mqtt
    server: mqtt://127.0.0.1:1883
    user: z2m # The username we set in Mosquitto
    password: <YOUR_PASSWORD> # The pw we set in Mosquitto
serial:
    # Adapter
    port: /dev/ttyUSB-ZBDongleE
    adapter: ember
advanced:
    # Network
    channel: 25
    network_key: GENERATE
    pan_id: GENERATE
    ext_pan_id: GENERATE
    # MQTT
    output: 'json'
frontend:
enabled: trueExplanation:
- Explicit settings:
mqttserver: mqtt://127.0.0.1:1883— Point to the port of mosquittouser: z2m— The username we set in the previous steppassword: <YOUR_PASSWORD>— The password we set in the previous step
serialadapter— According to EmberZNet adapters (Silicon Labs) | Zigbee2MQTT ↗, the adapter we use (ZBDongleE) isemberbased.
advancedchannel— Zigbee channel. Set to 25 to avoid problems. Default 11.
- Implicit settings:
serialrtscts: false— According to doc,emberbased adapter can only use software flow control, which meansrtscts(Hardware Flow Control) has to befalse. The setting is default tofalse.
frontendport: 8080— defaulthost: 0.0.0.0— default
Then, in the same folder with docker-compose.yaml, run the container
docker compose up -dCheck docker’s logs:
docker compose logs zigbee2mqttCheck if this is at the end of the logs:
...
z2m  | [2025-09-02 16:51:59] info:      z2m: Connected to MQTT server
z2m  | [2025-09-02 16:51:59] info:      z2m:mqtt: MQTT publish: topic 'zigbee2mqtt/bridge/state', payload '{"state":"online"}'
z2m  | [2025-09-02 16:51:59] info:      z2m: Started frontend on port 8080
z2m | [2025-09-02 16:51:59] info: z2m: Zigbee2MQTT started!Congrats! Both Mosquitto and Zigbee2mqtt are running properly now!
3.4 Check out the Z2M Frontend#
After both Mosquitto and Zigbee2mqtt are running, and we have frontend.enabled: true in z2m configuration, we can open the frontend to setup devices or further configure the zigbee network. In your browser, go to http://<host_ip>:8080, You should see
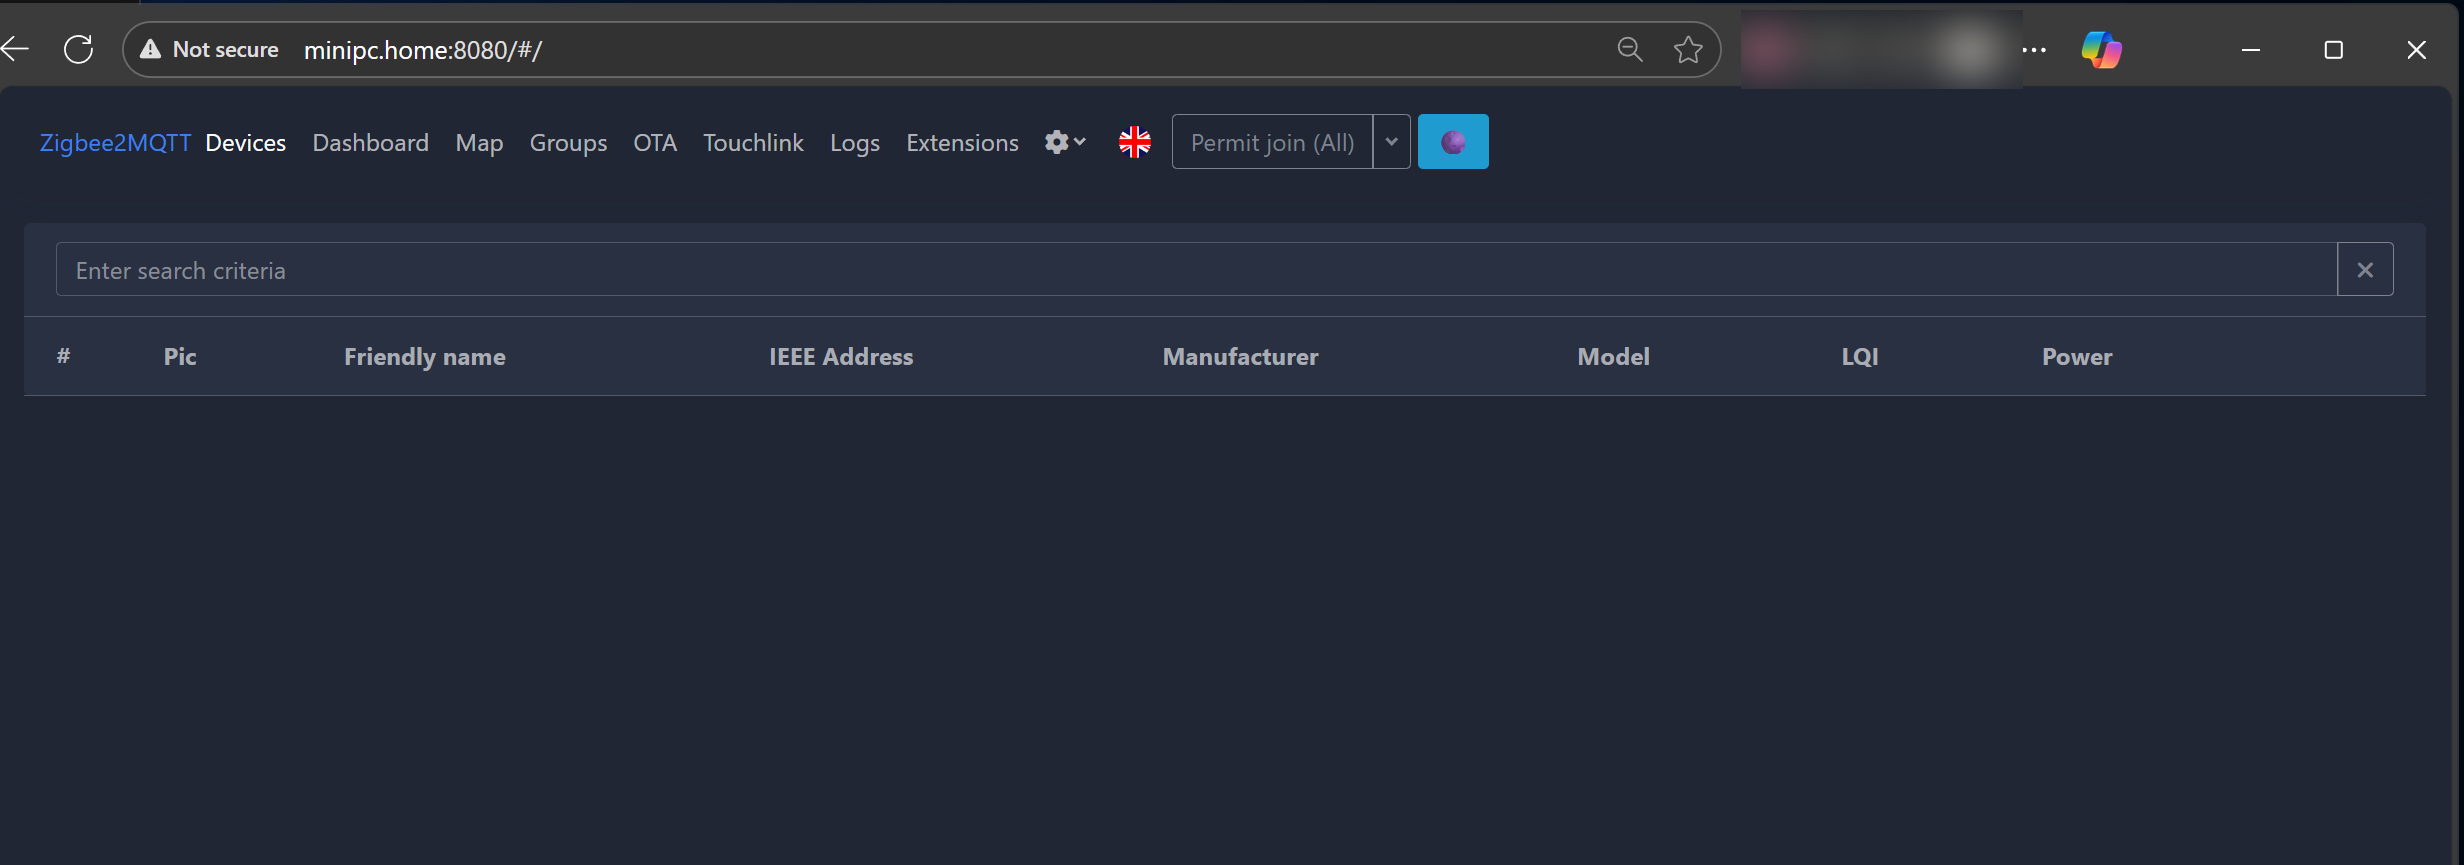
You should be able to scan devices by clicking the “Permit to join” button (Next to the language setting icon)
4. Integrate MQTT into HA#
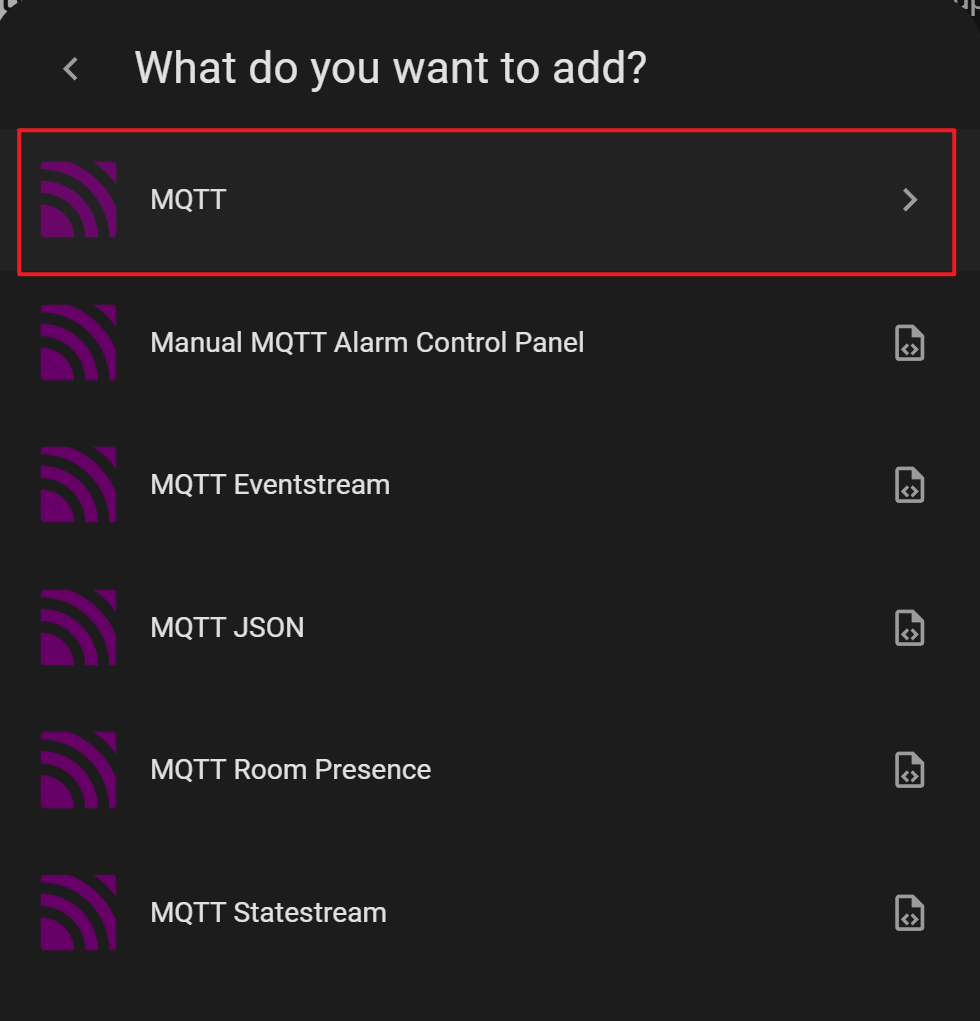
On HA, go to Settings → Devices & Services → Add integration → Search “MQTT”

Select the first one
In the next form we need to config the MQTT broker, which is the Mosquitto we setup earlier.
- Broker address —
localhostor127.0.0.1since we’re running Mosquitto on the same host - Port — Mosquitto’s default port
1883 - Username — The username we set for Mosquitto
- Password — The password we set for Mosquitto
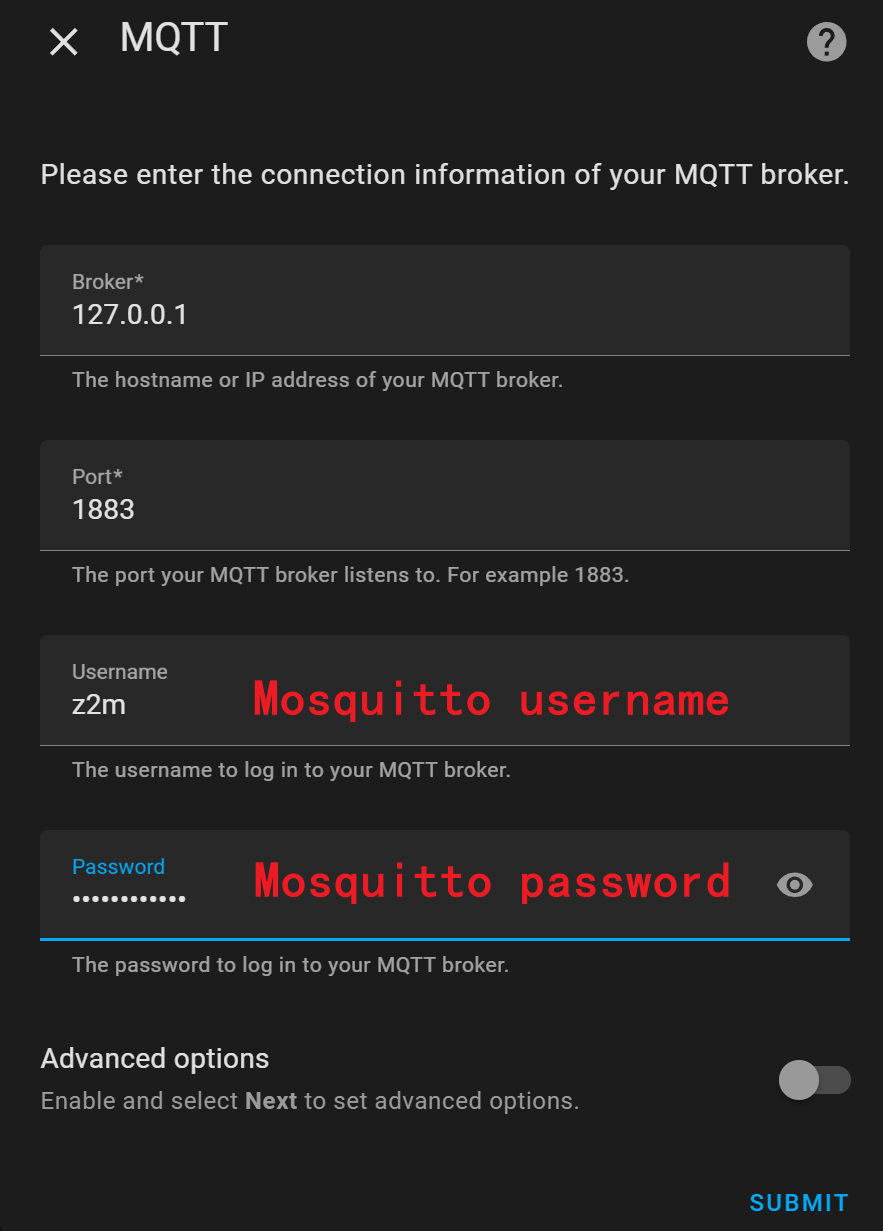
We don’t need “Advanced options” here, so just hit “Submit”.
Tada! We can see the Bridge (Z2M) and one existing device (Tuya Temperature & humidity sensor) are detected.
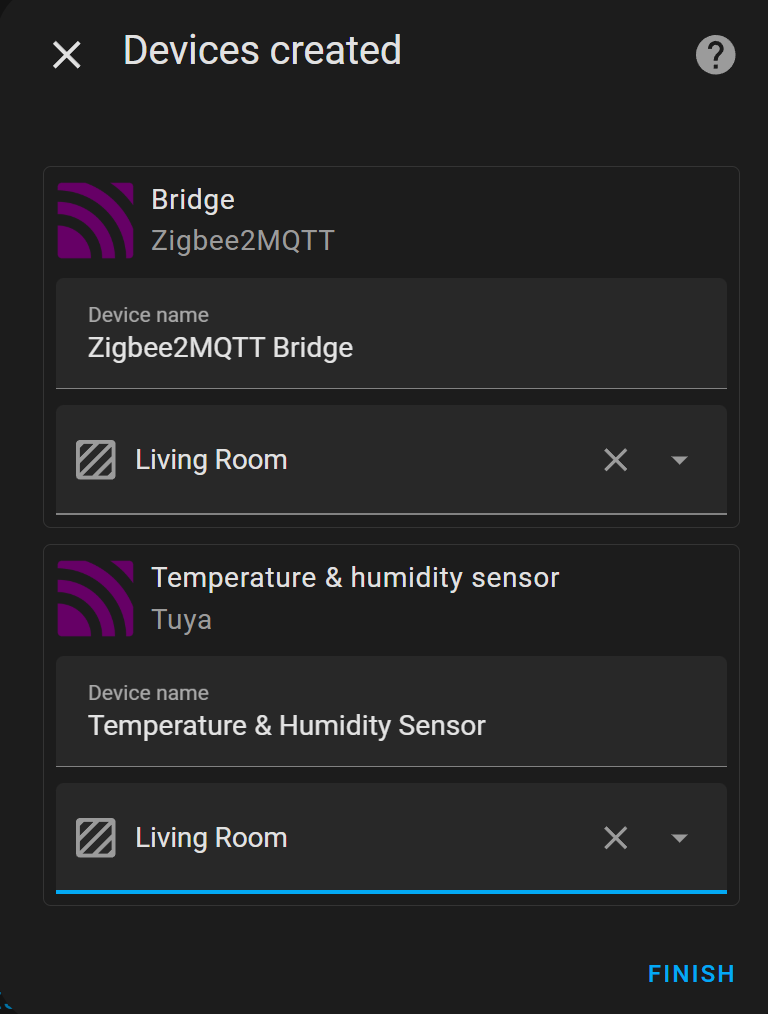
Any new devices added to Z2M will also be added into HA in the future.
Summary#
This guide walked through flashing the Sonoff ZBDongle-E firmware, setting up Mosquitto as an MQTT broker, configuring Zigbee2MQTT, and integrating everything with Home Assistant — giving you a fully local Zigbee network ready to connect devices.